I See In Infared

[ Previous posts on this subject are here, here, and here. ]

Installing LIRC on the Pi was a snap, but took about 30 minutes as there was an update to Raspian that needed to be downloaded.

I removed the IR receiver from the LED light’s circuit board, wired it to the Pi, followed the instructions for setting up a new receiver and remote, and pressed all the buttons asked of me by irrecord.

My /etc/lirc/lircd.conf file for the APA 1616 remote ended up looking like:

begin remote
name apa1616
 bits 16
 flags SPACE_ENC|CONST_LENGTH
 eps 30
 aeps 100
header 8953 4467
 one 563 1671
 zero 563 555
 ptrail 567
 repeat 8958 2226
 pre_data_bits 16
 pre_data 0xF7
 gap 107360
begin codes
 KEY_VOLUMEUP 0x00FF
 KEY_VOLUMEDOWN 0x807F
 KEY_POWER 0x40BF
 KEY_POWER2 0xC03F
 KEY_A 0x20DF
 KEY_B 0xA05F
 KEY_C 0x609F
 KEY_D 0xE01F
 KEY_E 0x10EF
 KEY_F 0x906F
 KEY_G 0x50AF
 KEY_H 0xD02F
 KEY_I 0x30CF
 KEY_J 0xB04F
 KEY_K 0x708F
 KEY_L 0xF00F
 KEY_M 0x08F7
 KEY_N 0x8877
 KEY_O 0x48B7
 KEY_P 0xC837
 KEY_Q 0x28D7
 KEY_R 0xA857
 KEY_S 0x6897
 KEY_T 0xE817
 end codes
end remote

After irrecord was finished, I hit keys on the remote while at the console, and letters would appear.   This is because I named the buttons KEY_A, etc.   I didn’t have to run a command to see that I was receiving IR, which was nice.

So, now that I know what the codes are, I should be able to send them to the light using LIRC’s irsend command and have it change color, right?   I tried just that.

Nothing.

Nada.

Damnit!

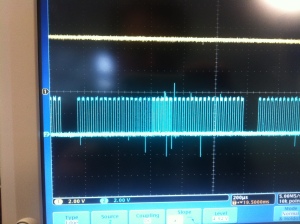
Okay, time to get out the oscilloscope and see what the IR receiver sends, and what the Pi sends, and make them match.   The top is the output of the IR receiver, and what we want our signal to look like.  The bottom is what the Pi is doing with its output pin.

photo  photo 1 (5)

As you’ve probably noticed, the signals are very different.   The IR receiver starts at 5V, gets pulled down to 0V for some period of time, and then is returned to 5V.   The GPIO pin starts at 0V, rises to 3.3V, but rather than staying there, oscillates at some frequency for a period of time.  Zooming in on one of the pulses, we see this:

photo 2 (5)

It turns out that these waveforms correspond to a 38KHz carrier frequency that is is a part of the IR communications spec.   The IR receiver hardware filters out the carrier.  Since that’s the signal the light expects, we need to get Linux to do the same for us.

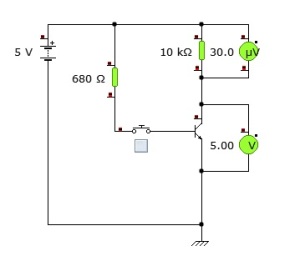
Changing the signal from active low to active high, and from 3.3V to 5V is fairly straightforward.   We just need an NPN transistor.   We’ll use the 3.3V GPIO output to drive the base, and put 5V across the collector and emitter.  The output to our light gets wired in between the transistor and the 10kOhm resistor.

I discovered an educational program (Yenka) recently that lets you simulate simple circuits, and it’s free for non-commercial home use.   I used it to build and test my circuit, and highly recommend it for the novice circuit designer.

Transistor-Open

This diagram shows that with the transistor input (base) at 0V, there is 5V across the collector and emitter.

Transistor-Closed

And with voltage (3.3V in reality; 5V in the simulation) applied to the base, there are nearly 0V across the collector and emitter. This corresponds to inverting the output, and changing from a 3v3 signal to 5V.

This is all great, but what about eliminating the 38KHz carrier?

I got all psyched up to go modify the RPi GPIO driver for LIRC when I noticed that the existing driver had an option that can be changed at load-time.

softcarrier=0

Bless the author of that module.  I don’t have to change any code in order to turn it off.   So I made my /etc/modules file look like:

lirc_dev
lirc_rpi gpio_in_pin=14 gpio_out_pin=17 softcarrier=0

And I was off to the races.  By issuing commands on the Pi, I am now able to simulate remote control button presses, and control the light through software.

irsend SEND_ONCE apa1616 KEY_D

It doesn’t switch colors as fast as I’d like, but I can live with it.

Next: getting the IR filter off the Pi’s camera module without destroying it.

What through yonder window…

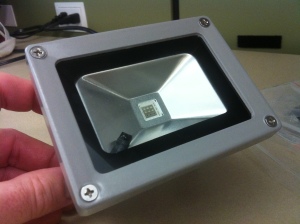
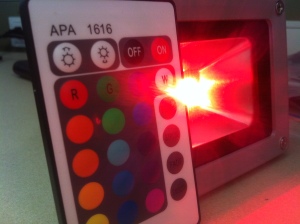
My LED light arrived in short order from Amazon.  Overall, I was pleased.  It is fairly sturdily constructed, has a plug on the end of the (very short) cord, and came with an IR remote.  It appears to be a small die with 9 LEDs embedded in it, 3 each of red, green and blue.

photo 2 (3) photo 1 (3)
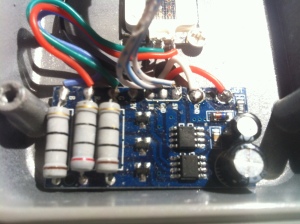
It’s also quite bright for just 10W, and comes apart easily.   Opening it up reveals a fairly simple dual voltage circuit board consisting of 2 ICs (an EEPROM and an unidentified microcontroller), some large resistors, and transistors so that the Microcontroller could switch the 12V LEDs on and off.  There’s also an IR receiver wired into the MCU for the remote control.

photo 3 (2)
I
 gave some thought to cutting into the board and generating PWM pulses to control each color of the light.   It would give me fine control over it, but at the expense of code complexity that I’d rather avoid.  And I could damage the LEDs if I accidentally overheated them by using too high a duty cycle.  Never mind that it was an inefficient use of the Pi’s GPIO pins and computing cycles (since the Pi doesn’t have hardware support for generating PWM, it would have to be done manually – yuck!).

I was aware of a program called LIRC for encoding and decoding IR signals for Linux.  Sure enough, someone had already done the hard work of making IR transmitters and receivers work with the Pi’s GPIO pins.   What if I made the Pi emulate the IR receiver and sent IR commands to the light via a hard-wired connection?     I could leverage the hard work of others, and use only a single GPIO pin.

This seemed a better and better idea the more I thought about it.

So my next steps seemed to be:

  • Get LIRC working on the Pi with the light’s IR receiver.
  • Determine what codes were used by the supplied remote
  • Be able to send those codes to the light through software.

Simple, right?


Next: I see in infared.

And there was still nothing… but you could see it!

I started thinking about my Raspberry Pi based security camera, and started wondering about what sorts of things it could do to make thieves decide to leave my house alone.  I need to startle them, or make them think that someone has seen them.  Certainly the cameras at Tommy’s house didn’t make them think twice.   Nor did the always-on high-intensity floodlights at another neighbors; these guys tried his car doors, too, but didn’t get anything.

I have to assume that traditional motion-detection floodlights might deter the newest and jumpiest of criminals, but more experienced thieves will ignore them because their behavior is predictable.  Walk here,  Click.  Light.   No experienced thief thinks that it’s a person turning on the light.

No, I need to do something they’ve never seen before.  Something that plays to their fears.

I need to scare the shit out of them.

I had the idea of switching a very high-intensity light on and off like a strobe, several seconds after motion was detected.   Let them approach the car.   Concentrate on it.  Then they’re hit with a 5Hz strobe for a second or two, followed by the entire area being lit up like a prison yard.

6KHMIMuscoLights

With some luck, the thief will look towards the strobing light – and my camera – as I take full-exposure pictures.  I told my neighbor about what I wanted to do.  He liked the idea.  Then he said something brilliant.

“Can you strobe red & blue lights?   They’d think the cops have shown up.”

I could hardly wait to get back to AliBaba and Amazon to see what I could find for high-intensity, color-settable lights.

I found this.

51XEIa04sGL

10W may not be enough, but the price is sure right at $15 delivered.  But is it hackable?   We’ll find out soon enough.

No honor among thieves

I recently moved from Austin to Houston (I have family here; shut up) and hadn’t even unpacked properly before my car was burglarized by this fine upstanding gentleman, seen here entering my neighbor’s truck.

PB_home_20130719043328Now, my neighbor was pleased as punch that his new security system seems to have worked – he got images of people stealing his very expensive Maui Jim sunglasses from the truck that his son left unlocked.   He spent time and beer trying to get me to buy and install a similar system until I pointed some things out to him:  The camera wasn’t a deterrent; he still got ripped off.   The images aren’t clear enough to make a positive ID, despite the fact that the camera was less than 15′ away from the miscreant, and despite the kid looking straight into it for a few seconds.

There are some positives, though.  The images are clear enough to identify the number of thieves (2) and their race (caucasian).   We can see the type of car they drove, but not the color or license plate.  The camera presented proof positive that yes, Tommy had been burglarized.  And he was the one to tell me that this kid then spent about a minute in my driveway (in the upper right of that picture) and I then discovered that, yes, I was in fact missing a GPS receiver from a vehicle that someone had left unlocked.

My neighbor’s system cost him about $600, and took him a day to install, crawling around in his attic.   The control software is okay, but extracting video in a usable format is an exercise in frustration.  The cameras do well enough in the dark, with their softly glowing IR LED rings, but the resolution seems like VCR-quality.   Maybe 250 lines of resolution?  300?

In short, it’s cheap, Chinese crap.

There has to be a better way.   And it can’t cost an arm and a leg.

I work with or at least near embedded systems at my day job, so this screamed out for a Raspberry Pi solution.   It didn’t hurt that the Pi’s camera module had recently shipped, and boasted 1080P video recording, and a 5MP still image sensor.   There are even videos of people removing the IR filter from the camera so that it can see in the dark.

After some thought, I determined that the perfect system would be able to do the following:

  • Detect motion in a smart way
  • Record video
  • Get high-enough resolution still or video images to make a positive identification
  • Act as a deterrent.
  • Alert me in real (SMS?) and delayed (email) time to interesting events.
  • Let me monitor the scene and trigger responses remotely.
  • Have different responses depending on things like time of day.
  • Not cost an arm and a leg.   Perhaps $100-120 for one camera unit.

This should be fun.  And the Pi seems like a great fit.

Next: And there was still nothing, but you could see it.

Thoughts on cross-distcc

I realize that I’m not the first person to cross-compile with distcc. Hell, I’m not even the first person to suggest doing it on the Pi. But it wasn’t in common use, at least not as far as I could tell, and I’m coming to love the technique.

I didn’t buy a Pi to play with different build methods (though it does seem that’s all I’ve done with it since it arrived). I bought it to do projects, and I got bored waiting on native compiles, especially when they didn’t succeed for one reason or another.

Projects

Astrophotography is one of those things I’ve had in the back of my mind for years, but have never wanted to sink a large chunk of time or money into. But it’s influenced my purchases over the years.

When I bought a telescope, I bought a guided one that could attach to a camera. When I bought a camera, you bet it was compatible with my scope.

When the Pi came along, one of the things that occurred to me was how great it would be to use as a guidance computer for a piece of software known as “PHD“. They already had an open-source version for Linux so getting it running on the Raspberry Pi should just be a simple matter of cross-compiling it for the ARM.

Building it natively probably would have worked just fine, but I hate HATE HATE waiting on builds when I know there’s a faster way, so I started down the path of cross-compiling it using LTIB.

Well, PHD is an X program, with lots of dependencies. After a few hours of getting my 3rd or 4th X library updated and cross-compiling, it was apparent that I was headed down the wrong path.

Using cross-distcc

After I hit on the idea to use distcc with a cross compiler, it occurred to me that I had probably found what I was looking for: faster builds without the headaches associated with cross-compiling.

I attempted to build the open-phd source on the Pi, installing those packages that were pre-built, and compiling those for which no package was available. (A funny moment occurred when I was building the NASA-written imaging library libcftsio and it complained that I didn’t have a FORTRAN compiler installed on the Pi.)

30 minutes later, I was running the program on the Pi.

Now this is why I bought a Pi.

Time to get to work.

A good compromise: Cross-compiling with distcc

Cross-compiling for the Raspberry Pi using distcc

[ Update: If you’re looking to build a minimal rootfs, want to cross-compile in a more traditional way, or want to build using QEMU, then take a look at some of my other posts. Thanks! ]

If you’re new to Linux, or to the Raspberry Pi, you might feel like we’re pushing the leading edge. And we are in several ways; the Pi is an absolute miracle of technology, but mostly due to its size and price; it’s not very fast compared to modern computers.

Years ago, building large programs like the Linux kernel could take hours on what was then a modern workstation. So, undoubtedly while waiting on a compile, the folks behind Samba were staring at one machine running as hard as it could while dozens of others in the office sat idle. They wondered if they could find a way to easily distribute the build tasks to all the machines in the office, and so they wrote something called distcc.

I won’t go into all the details here, but basically distcc intercepts calls to the regular compiler and sends the work to other machines over the network. The other, slave machines do the actual compilation and send the object files or error messages back to the master computer, who then links them together.

Do you see where I’m going with this?

We’re going to use distcc on the Pi. Instead of building the files locally, the Pi is going to send them over the network to a fast computer which is running an ARM cross-compiler. The network computer will send back ARM objects to the Pi.

The beautiful thing about this is that as far as the package that’s being built can tell, this is a local compile. There’s some initial setup, but on a per-package basis, there are no hoops to jump through in order to leverage the faster computer.

Setting up the slave computer

I did the following on my large, modern Linux machine:

Setup the cross-compiler

I grabbed the pre-built cross compilers from the RPi Foundation’s repository https://github.com/raspberrypi/tools. Specifically, I installed the compilers in /opt/cross so that they looked like this:

$ ls -l /opt/cross/arm-bcm2708/
drwxr-xr-x 7 root root 4096 Oct  4 11:05 arm-bcm2708hardfp-linux-gnueabi
drwxr-xr-x 7 root root 4096 Oct  4 11:05 arm-bcm2708-linux-gnueabi
drwxr-xr-x 7 root root 4096 Oct  4 11:05 gcc-linaro-arm-linux-gnueabihf-raspbian

You can also get an RPM of the compilers that will place them in /opt/cross from https://github.com/downloads/midnightyell/RPi-LTIB/raspberrypi-tools-9c3d7b6-1.i386.rpm. I installed this rpm on my Ubuntu system using the command:

sudo rpm -i --ignorearch raspberrypi-tools-9c3d7b6-1.i386.rpm

Note that this is the same file, installed in the same location as used for LTIB. If you’ve already installed LTIB, you already have these compilers installed in the correct place.

Install distcc

sudo apt-get install distcc

Then edit /etc/default/distcc so that it looks like this:

STARTDISTCC="true"
ALLOWEDNETS="0.0.0.0/0"
LISTENER=""
NICE="0"
JOBS=""
ZEROCONF="true"
PATH=/opt/cross/arm-bcm2708/gcc-linaro-arm-linux-gnueabihf-raspbian/arm-linux-gnueabihf/bin/:\
/opt/cross/arm-bcm2708/gcc-linaro-arm-linux-gnueabihf-raspbian/libexec/gcc/arm-linux-gnueabihf/4.7.2:\
${PATH}

You may wish to adjust the ALLOWEDNETS and LISTENER parameters to suit your network, but these defaults should work. I’ve also adjusted the JOBS parameter to be a largish number (50) so that the Pi will send work as fast as it can generate it to my desktop machine.

Now start the distcc daemons

sudo /etc/init.d/distcc restart

Setting up the Raspberry Pi

I started with the latest Raspbian SD card image, did the usual setup including

sudo apt-get update
sudo apt-get upgrade

Followed by

sudo apt-get install distcc

Make sure that when “gcc” is called, it actually calls distcc:

export PATH=/usr/lib/distcc:${PATH}

Tell the RPi what hosts to use

Edit ~/.distcc/hosts to resemble the following:

192.168.1.100
--localslots=1
--randomize

Where the ipaddress is that of your slave computer; .100 in my example. If you have more than one slave, add them to this file, one per line.

Let’s compile MAME!

wget http://prdownloads.sourceforge.net/advancemame/advancemame-0.106.1.tar.gz
tar xvzf advancemame-0.106.1.tar.gz
cd advancemame-0.106.1
./configure
make -j8

Conclusions

AdvanceMAME took between 12 and 15 minutes to build in this way on my machine, and I’m pretty sure the Pi was the limiting factor. As a comparison, it took 42 minutes to build in QEMU, and under 1 minute to cross-compile on this same machine. One of these days, I’ll time the build on the Pi, but I suspect it’s in the 2-hour range. [ Update: 55 minutes with the Pi in turbo mode at 1GHz; this really makes QEMU (at 42 minutes) look bad! ]

Overall, I like this technique. Once it’s set up, it should work automatically. I didn’t have to fight any of the Makefiles in order to get things to build, and it worked much, much faster than a native or an emulated build. And — once I solve the Pi bottleneck — I can keep throwing spare machines at this; any Linux machine sitting idle is a candidate to be turned into a distcc server. [ Update: Someone is now working on a Linux LiveCD to turn any idle x86 into a distcc cross-compiling machine! ]

For pure speed, you can’t beat cross-compiling directly on the big machine. But for convenience when speed isn’t absolutely critical, cross-compiling with distcc rocks!

Compiling MAME for the Raspberry Pi with QEMU

It’s become apparent that some people are more concerned that a build goes smoothly rather than as fast as possible.   Having recently played around with cross-compiling X windows for the Pi, I can see how one might form that opinion.   Sometimes, you just want things to work, even if they are slower than optimal.

So, let’s talk about another, easier way to build software for the Raspberry Pi on your larger Linux desktop or laptop.   Indeed, we won’t even need a Pi to do this.

Emulation

An emulator is a program that acts like another CPU at the instruction level.  In our case, we’re going to be running a program that acts like an ARM processor on an x86 Linux system.   More specifically, we’re going to run ARM binaries on our x86, and the emulator will be taking ARM instructions and translating them to x86 instructions on the fly.

That’s actually pretty cool, when you think about it.

Of course, emulation comes at a cost: speed.  An emulated compile will take considerably longer than a cross-compile.  But that’s to be expected, when you consider how hard the CPU is working in order to be able to run non-native binaries.

Installing QEMU

The emulator we’ll be using is a fairly well-known one called QEMU.  You install it on your Debian-based (Ubuntu, in my case) linux host by typing

apt-get install qemu-user-static

A similar “yum install” command will install QEMU on RedHat.

We’ll be using the static version of QEMU.  This just means that it won’t be calling making any function calls to anything that resides in a shared library; everything QEMU needs is contained in the one executable.   I’ll explain why later.

Getting a root file system

We’re going to need a root filesystem that’s filled with ARM software.   I like Raspbian for this, so let’s go get it from http://www.raspberrypi.org/downloads.   The current one as of this writing is 2012-09-18-wheezy-raspbian.zip.

Once it’s downloaded, unzip it.

unzip 2012-09-18-wheezy-raspbian.zip

Now let’s extract the files in the rootfs into a local directory.   This isn’t strictly necessary — we could compile everything inside the mounted .img file, and when we’re finished, copy the img file to an SD card, and boot it on the Pi.   That seems like it has too many moving parts for my tastes, though.  So let’s keep it simple and just copy everything locally.

Normally, this is straightforward enough, you would just issue

sudo mount -o loop 2012-09-18-wheezy-raspbian.img /mnt

…and you could cd /mnt and copy the files to a local directory.

But Raspberry Pi SD cards have 2 partitions on them and the above command would just mount the first partition, which only contains the files in /boot.   Of course, we want the 2nd partition.  Rather than explain how to calculate the offset of the 2nd partition inside the image file, and how to use that to tell mount how to mount the file properly, I’m going to provide a script that I wrote called rpi_copyrootfs.sh.

#!/bin/bash

PATH=/sbin:${PATH}

set -e

usage()                                                                                                                                     
{                                                                                                                                           
cat <<EOF                                                                                                                                   
                                                                                                                                            
  `basename $0`:                                                                                                                            
                                                                                                                                            
     Make a Raspberry Pi SD card image                                                                                                      
                                                                                                                                            
       -h                     : This help message                                                                                           
       -d            : Destination directory                                                                                       
       -i         : The name of the image file ( `basename ${IMGFILE}` )                                                        
       -v                     : Turn on verbose output                                                                                      
EOF                                                                                                                                         
}                                                                                                                                           

while getopts “hi:d:v” OPTION
do
     case $OPTION in
         h)
	     HELP_OPT=1
             ;;
         i)
             IMAGEFILE_OPT=$OPTARG
             ;;
	 d) 
	     DESTDIR_OPT=$OPTARG
	     ;;
         v)
             VERBOSE=1
             ;;
         ?)
             usage
             exit
             ;;
     esac
done

IMGFILE=${IMAGEFILE_OPT:-2012-09-18-wheezy-raspbian.img}
DESTDIR=${DESTDIR_OPT:-rootfs}

if [ ! -z "${HELP_OPT:-}" ] ; then
    usage
    exit
fi

if [[ ${EUID} != 0 && ${UID} != 0 ]] ; then                                                                                                 
    echo "$0 must be run as root"                                                                                                           
    usage                                                                                                                                   
    exit -1                                                                                                                                 
fi                                                                                                                                          

BYTES_PER_SECTOR=`fdisk -lu ${IMGFILE} | grep ^Units | awk '{print $9}'`
LINUX_START_SECTOR=`fdisk -lu ${IMGFILE} | grep ^${IMGFILE}2 | awk '{print $2}'`
LINUX_OFFSET=`expr ${LINUX_START_SECTOR} \* ${BYTES_PER_SECTOR}`

if [ ! -z "${DESTDIR}" ] ; then

    if [ ! -d ${DESTDIR} ] ; then
	mkdir -p ${DESTDIR}
    fi
    LINUXMOUNT="__linuxmnt.$$"
    mkdir -p ${LINUXMOUNT}
    mount -o loop,offset=${LINUX_OFFSET} ${IMGFILE} ${LINUXMOUNT}
    cd ${LINUXMOUNT};
    tar cf - * | ( cd ../${DESTDIR}; tar xvf - )
    cd -
    umount ${LINUXMOUNT}
    rm -rf ${LINUXMOUNT}
fi

Running this script as follows will copy the Raspbian root file system into a local directory called rootfs.   This is where we’ll build.

./rpi_copyrootfs.sh -i 2012-09-18-wheezy-raspbian.img -d rootfs

Cheating with automatic filesystems

This next step is actually not the perfectly correct thing to do, but it’s generally good enough to build with.

Our local rootfs copy isn’t a real root filesystem.   In particular, /dev, /proc and /sys are empty, and that might upset some build tools.

So rather than try to create something that looks like an RPi /proc, /sys, and /dev, we’re going to cheat and mount the host system’s versions of these directories inside the rootfs.

 
sudo mount --bind /proc rootfs/proc
sudo mount --bind /sys rootfs/sys
sudo mount --bind /dev rootfs/dev

Magic

All we have to do now is copy the static version of the ARM emulator into the rootfs directory, issue the chroot command, and then run the emulator.

export QEMU=`which qemu-arm-static`; sudo cp -p ${QEMU} rootfs/${QEMU}
cd rootfs
sudo chroot .
pwd
uname -m
${QEMU} /bin/bash
uname -m

Let’s take a look at what’s happened here. We copied the x86 QEMU program into the ARM-based rootfs directory. Okay, that’s not terribly exciting. Then we issued the chroot command inside the rootfs directory. This made it, for all intents and purposes, so that our rootfs directory became /. That is anytime we type /bin/bash we’re actually referring to rootfs/bin/bash.

But wait! That /bin/bash is an ARM program that we just copied from the SD card image. There’s no way that’ll run on an x86!

Unless we run the ARM emulator. Note that uname -m now shows that we’re an ARM processor. Running ARM binaries.

Poke around! Explore! It’s like we’re in text-mode on an RPi.

The same utilities — the ones that don’t talk directly to hardware, at least — work as you would expect. The config files and libraries are in the right places. It looks like we’re ready to go.

Setting up a build environment

Are you ready for this? This emulated environment is like you’re on an RPi, right?

apt-get update
apt-get upgrade

This blew my mind when it worked.

root@midnightyell:/# gcc --version
gcc (Debian 4.6.3-8+rpi1) 4.6.3
Copyright (C) 2011 Free Software Foundation, Inc.
This is free software; see the source for copying conditions.  There is NO
warranty; not even for MERCHANTABILITY or FITNESS FOR A PARTICULAR PURPOSE.

Building MAME

So, most packages will build inside this emulator just like they would on a real Linux host. That is, the usual steps are:

Untar the source package
cd into the directory
./configure
make
make install

Indeed, AdvanceMAME is very nearly like that. Except that I ran into problems building advanceMAME 0.106.1 with the standard raspbian gcc 4.6. I was getting bad object files as output! I thought this was a problem with the emulator, but I ran into the same problem when I built MAME natively on my RPi! After some trial and error, I discovered that gcc4.7 works just fine for MAME.

So, let’s get rid of gcc-4.6, and install gcc-4.7.

apt-get remove -y gcc-4.6
apt-get remove -y cpp-4.6
apt-get install -y gcc-4.7
apt-get install -y cpp-4.7
cd /usr/bin
ln -s cpp-4.7 cpp
ln -s gcc-4.7 gcc
ln -s gcc-ar-4.7 gcc-ar
ln -s gcc-nm-4.7 gcc-nm
ln -s gcc-ranlib-4.7 gcc-ranlib

Go and get the advancemame source from here: http://advancemame.sourceforge.net/download.html. You can place it into the rootfs from another terminal window, and then access it inside the chroot’d process.

In any case, place it somewhere out of the way, and do the usual build steps:

tar xvzf advancemame-0.106.1.tar.gz
cd advancemame-0.106.1
./configure
make -j

That’s it.

Really.

[Update: It took 42 minutes to build AdvanceMAME inside QEMU; the same machine cross-compiles it in 50 seconds, but that’s after an hour of fighting the spec file so that it would cross-compile at all!]
The First Cut is the Deepest

Running LTIB for the First Time

I was recently reminded that getting LTIB running for the first time can be a bit frustrating, so I thought I’d do it on a freshly-installed instance of Xubuntu that I have running on my Asus netbook, and write up a quick tutorial.

I’ve also been touting that I can cross-compile a rootfs for the Pi “in under 10 minutes” with LTIB.  And this is absolutely true on my 6-core Xeon Linux workstation.  But I realize that despite the fact that that machine is a couple of years old, it’s still considered to be pretty fast.

So we’ll fire up my nearly 4 year-old Asus Aspire One and see how she does.   That should put an upper-bound on any time claims.  After all, who in their right mind would use a 1.6GHz Atom machine as a build platform?

[Update: 3 hours and 18 minutes wall-clock time to build the basic RPi configuration from scratch — with the vast majority of that building the kernel + modules — on a 4-year-old Netbook.]

Getting LTIB

This has been discussed before, but, briefly, to get the latest code from the repository (and you want the latest, as RPi support is not yet in any of the static releases) you’ll need perl5 installed, as well as cvs.   Issue the following commands:

wget http://ltib.org/pages/netinstall.txt
perl netinstall.txt

You should now have LTIB installed in the directory that you specified to netinstall.txt.

Installing packages

Before we run LTIB, let’s make sure the host is configured more-or-less properly.  LTIB will attempt to tell you what packages it needs to have installed on the host system, but the list falls short.   The LTIB mailing list provided an informal list of packages needed for Ubuntu about v12.04.  I’ve encapsulated that knowledge into the following script that you can run:

#!/bin/bash

set -e

# sudo apt-get install -y install
sudo apt-get install -y patch
sudo apt-get install -y g++
sudo apt-get install -y rpm
sudo apt-get install -y zlib1g-dev
sudo apt-get install -y m4
sudo apt-get install -y bison
sudo apt-get install -y libncurses5-dev
sudo apt-get install -y libglib2.0-dev
sudo apt-get install -y gettext
sudo apt-get install -y build-essential
sudo apt-get install -y tcl
sudo apt-get install -y intltool
sudo apt-get install -y libxml2-dev
sudo apt-get install -y liborbit2-dev
sudo apt-get install -y libx11-dev
sudo apt-get install -y ccache
sudo apt-get install -y flex
sudo apt-get install -y uuid-dev
sudo apt-get install -y liblzo2-dev
sudo apt-get install -y libglib2.0-dev

if [ `uname -m` == "x86_64" ] ; then
  sudo apt-get install -y ia32-libs gcc-multilib lib32g++

  if [ ! -e /usr/lib32/libstdc++.so ] ; then
    sudo ln -s /usr/lib32/libstdc++.so.6 /usr/lib32/libstdc++.so
  fi

else
  echo "Not 64-bit; skipping unneeded packages"
fi

Of course, package names can change, and other distros may have other dependencies, but this is the script that worked for my netbook.

Configuring a proxy server

Chances are you don’t need to configure a proxy server to use LTIB.   But if you get a timeout message when attempting to download packages from the gpp (Global Package Pool), you might need one.  Here’s how to set it up.

Unfortunately, LTIB doesn’t use the usual proxy server environment variables (http_proxy, HTTP_PROXY, etc.) but instead relies on the .ltibrc file in the directory where you checked out the ltib source.

# The HTTP proxy for internet access
# example: http://USER:PASSWORD@somehost.dom.net:PORT
%http_proxy
http://proxy.midnightyell.net:8080

And then further down, change %gpp_proxy from 0 to 1

%gpp_proxy
1

Running ltib

Change into the directory where you checked out the ltib tree, and type ./ltib.   You’ll see

Installing host support packages

and a warning about how this may take a long time the first time you run it.   What’s happening here is that LTIB is building and installing more packages needed for its own operation in /opt/ltib.   It’s installing them in a separate and distinct RPM database, so there’s no worry about it clobbering the versions of packages you already have installed.   If you ever need to change the packages in /opt/ltib, do the following:

./ltib --hostcf

And that will let you configure the packages installed on the build system.

Pre-Positioning the RPi Toolchains

While we’re waiting for LTIB to complete setup, we might as well look ahead a little bit.

Once we run ltib and choose RPi as our platform, it will complain about not being able to find the RPM that contains the toolchains.   The maintainers of the Global Package Pool are unable to host the RPi toolchains, so we must fetch it and place it in the Private Package Pool or in a local directory (one specified in .ltibrc:%ldirs) so that LTIB can find it.

The easiest thing to do is to download the official RPi toolchains as an RPM file from https://github.com/downloads/midnightyell/RPi-LTIB/raspberrypi-tools-9c3d7b6-1.i386.rpm and place the file in /opt/freescale/pkgs or /opt/ltib/pkgs.   LTIB will then install the RPM when it needs one of the toolchains contained therein.

Finally!

./ltib -c

Choose the Raspberry Pi as the platform, then exit, Save = yes.

The first time compiling for a new platform takes a bit longer than subsequent builds.   This is because LTIB actually caches the source tarballs in /opt/ltib/pkgs, so once the 100M kernel source tarball has been downloaded, you don’t have to do it again.

In fact, LTIB caches binary RPMs in rpm/RPMS/arm so if it needs to install a package that was previously built and hasn’t changed, it won’t waste time recompiling it.

Don’t go too crazy at first, choosing packages willy-nilly.  Not all packages work on the pi yet.  Start with the default configuration.   It will build a kernel from source, and use busybox for most of the utilities in the rootfs.  If all goes well, at the end of the build, you will be prompted with a banner like:

 _   _            _ 
| | | | ___ _   _| |
| |_| |/ _ \ | | | |
|  _  |  __/ |_| |_|
|_| |_|\___|\__, (_)
            |___/

That instructs you to issue 1-2 sudo commands in order to build the RPi SD card image. Unfortunately, the post-build script is executed with regular user privileges, and the LTIB maintainers decided that it would be better to prompt the user to issue the sudo commands than to potentially block an automated build by prompting for a sudo password.

In any case, you can edit config/platform/rpi/post_build.sh; so that it executes the commands rather than echoes them to the screen.    If you do, it makes life easier if you modify /etc/sudoers so that the commands can be executed with no password prompt.

My /etc/sudoers has the following line, and my build user is a member of the admin group, so this works for me:

%admin ALL = NOPASSWD: ALL

Writing the SD card image

The rpi_sdcard.img file that results from all of this is a bootable image that needs to be written to the SD card with dd.

Be.  Extremely. Careful. to ensure that you are writing to the correct device.   Failure to Be.  Extremely. Careful.  will result in you overwriting another disk drive in your system with this RPi image.   This would be most unfortunate if it were the disk you’ve booted from, or one containing your vacation pictures from the Tesla Museum.  Or the birth of your first child.

If you’re not 100% sure of what you’re doing, stop now.

Okay, that said, I determined that my SD card reader shows up as /dev/sdb on my machine.  There are several ways to do this, including watching the log for attach messages when you insert the card reader.  You might also try cat’ing /proc/partitions to see what’s new when you insert the SD card.

So, noting that we’re writing to the disk device (/dev/sdb) and not a partition (/dev/sdb1), for me, on my system (Be. Extremely. Careful. of what you’re doing before you cut & paste this command), the following command writes the sd card image to my SD card.

sudo dd if=rpi_sdcard.img of=/dev/sdb bs=1M ; sync

That’s it.

Next up: useful ./ltib tricks, and troubleshooting.

But I don’t want to go on the cart!

Is LTIB really the right choice for cross-compiling for the Raspberry Pi?  I mean, it’s designed to create an entire board support package for an embedded Linux system:  a kernel, bootloader, root file system, binutils, do memory allocation, system init, etc., etc., etc.

At first glance, that seems a bit like killing a horsefly with a flamethrower if all you want to do is cross-compile.  I was definitely of this opinion before I started making LTIB support the Pi.  I resisted doing the work.  I wanted to do things with my Pi, not futz around with things that were much like my day job.  This was supposed to be fun, right?  So I set out to manually cross-compile MAME for the Pi.

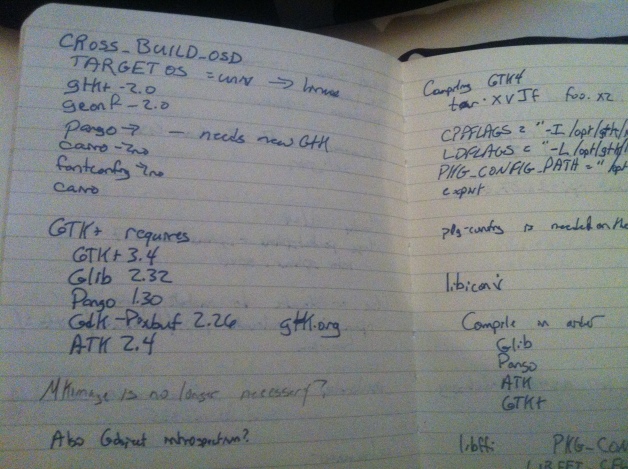
How’d it go?  Well, let’s take a look at my project notebook from a couple of weeks ago.

Image

God, my handwriting is atrocious.

Since I was compiling and linking for the ARM, all the libraries needed by MAME also needed to be compiled for ARM and installed on my build system.  And they needed to be installed in places other than /lib and /usr/lib, so I was going to have to pass in those locations to all the config scripts for all the packages.  Some of the software packages required that other packages be installed on the build system in order to work properly, so those needed to be compiled for x86 so that they could make ARM binaries.

And you can see a partial list of libraries needed just for MAME:  gtk+, gconf, pango, cairo, fontconfig, glib, gdk-pixbuf, atk, pkg-config, libivconv, libffi...

I was starting to feel like I was looking for metal so that I could make a shovel so that I could mine for iron that I needed to make the tool necessary to do the job that I wanted to do.

Ugh!

But these frustrations are exactly the problems that LTIB was designed to solve.  The fastest path through the woods, it turned out, was to make a tool that I was familiar with support my favorite new platform.

I knew that once I got basic support for the Pi working in LTIB, getting it to cross-compile AdvanceMAME would be pretty straightforward.  I could then grab the resulting RPM and install it on Raspian with no trouble at all.

More importantly, because it would cross-compile so quickly compared to a native compilation, I could easily try out different compilers, settings, etc. to see which combination produced the best binaries. [ Or which setup produced binaries at all. I ran into situations where I had to upgrade gcc from 4.6 to 4.7 when I was compiling advanceMAME inside QEMU or natively on the Pi; gcc-4.6 generated bad object files. It was painful to have a compilation fail like this after an hour. I was sold; cross-compiling in 5-10 minutes was for me! ]

Walkthrough for advanceMAME

To build advancemame-0.106, I did the following.

I put the source tarball into a direction mentioned in the lpp section of .ltibrc. /opt/freescale/pkgs, in my case.

In dist/lfs-5.1 I created advancemame/advancemame.spec as follows:

%define pfx /opt/freescale/rootfs/%{_target_cpu}

Summary   : Advance MAME Arcade Machine Emulator
Name      : advancemame
Version   : 0.106.1
Release   : 1
License   : MAME License
Vendor    : http:/advancemame.org
Packager  : Midnight Yell
Group     : Applications/Entertainment
Source    : %{name}-%{version}.tar.gz
BuildRoot : %{_tmppath}/%{name}
Prefix    : %{pfx}

%Description
%{summary}

%Prep
%setup

%Build
if [ ! -e obj/mame/linux/blend/cpu/m68000/m68kmake ] ; then
  # m68kmake must be built natively and advancemame doesn't handle
  # native building & spoofed paths well, so un-spoof the paths and
  # make it.
  ORIG_PATH=$PATH
  export PATH=$UNSPOOF_PATH
  ./configure
  mkdir -p obj/mame/linux/blend/cpu/m68000/
  make obj/mame/linux/blend/cpu/m68000/m68kmake
  export PATH=$ORIG_PATH
fi

./configure --prefix=$RPM_BUILD_ROOT/%{pfx}/%{_prefix} --host=$CFGHOST --build=%{_build} --mandir=%{pfx}/%{_mandir}
CFLAGS="-O2 -march=armv6j -mfpu=vfp -mfloat-abi=hard" \
make%Install
rm -rf $RPM_BUILD_ROOT
make install DESTDIR=$RPM_BUILD_ROOT/%{pfx}%Clean
rm -rf $RPM_BUILD_ROOT

%Files
%defattr(-,root,root)
%{pfx}/*

And note that AdvanceMAME is one of those packages that builds a tool that needs to be run natively so that it can build other files that run on the ARM — most packages will have simpler .spec files.

To add advmame to the menu system you have to modify 2 files in config/userspace.  pkg_map:

PKG_ADVMAME = advancemame

And extra_packages.lkc:

config PKG_ADVMAME
bool "advmame" 
help
  This package is a MAME emulator. It contains no ROMs.

That was it!  The next ./ltib -c had advMAME as a menu item under Packages, and when finished, LTIB left an RPM in rpm/RPMS/arm/advancemame-0.106.1-1.arm.rpm

Installing the rpm on Raspian is easy, though slightly non-standard in that you have to specify –relocate because the paths in the rpm include /path/to/ltib/dir/rootfs/usr/bin and you want to actually install to /usr/bin.

After I got AdvanceMAME and AdvanceMESS working, I made similar spec files for xtailpocketsphinx, and a few others.

Next, I want to get LTIB’s version of X up-to-date.  I have something special in mind for my Pi running a low-resource version of X.   Something special indeed…

Cross-compiling for the Pi made easy *

(*) Or at least a bit easier.

Last weekend at the talk given by Rob Bishop of the Raspberry Pi Foundation at Austin Hackerspace, I got up and spoke a little about some work I’d been doing around cross-compiling for the Pi using LTIB (the Linux Target Image Builder).  As LTIB has now made the Raspberry Pi an officially supported platform, I thought I’d write up something to introduce it to the community at large.

[ Update: See also my posts on Using QEMU to build for the Pi, and Using distcc to make cross-compiling for the Pi even easier! ]

First, some background:

What’s cross-compiling?

When you build software on the same type of system that it’s going to run on, it’s called building natively.  If you’ve been around Linux for a while, this is what you’re used to doing.  You build on x86, for an x86 target.

Cross-compiling is when you build on one platform to run on another.  Building on x86 for an ARM target like the Pi, for instance.

Why would I want to?

Speed!  My desktop machine is something like 50 times faster than my Raspberry Pi.  The Linux kernel takes about 3 hours to build natively on the Pi, and less than 10 minutes to build on my desktop machine.

What about Virtual Box, or QEMU?

Both are fine choices.  I’ve done QEMU.  It’s considerably faster than building natively on the Pi, but it still gets blown away by cross-compiling.

Are there disadvantages to cross-compiling?

Sure.  The main one is that cross-compiling is much more complex than building natively or using an emulator.  You have to get specialized versions of the C compiler, linker, etc. (collectively called the toolchain) for your host/target combination.  You have to ensure that the package build system knows how to use the right toolchain.  When it comes time to link your software, it must be against libraries that are also compiled for your target, which are going to be in directory locations other than the standard ones.

And some packages (I’m talking to you, Python, Apache, and MAME) weren’t written with cross compilation in mind.  These packages might compile program A, and then run A on the build system in order to build programs B, C and D.  So you have to know that A needs to be built for the x86, even though B, C and D are to be run on the Pi.

You have to dig in, root around, and hack things together to make things work.   All in all, it can be a huge pain in the ass.

Yuck!  Nevermind!

Wait!  There’s hope!

There’s a project called LTIB (the Linux Target Image Builder) that is designed to make cross-compiling much easier.  LTIB is designed to build an entire Linux distribution (really, a rootfs; it’s only a distro if you distribute it) for a variety of platforms using cross-compilers. It hides much of the complexity from you, and automates most of the task.

I was aware of LTIB because I used if for work.  It was great, but it didn’t support the Pi.

Until now.

As you can see from the screenshots above, LTIB uses the same menu interface as the Linux kernel.  If you’re comfortable building a custom kernel, you’ll do just fine in LTIB.

LTIB lets you pick the toolchain, kernel, & userspace packages you want to install.  You can even choose Busybox, instead of the full-sized versions of many common UNIX utilities.  And you can add your own packages fairly easily, too!

LTIB downloads the source tarballs from a repository (or looks at places on your local network or disk), expands them, builds everything for the target architecture, and creates a root file system.  In the Raspberry Pi’s case, LTIB will generate a bootable SD card image, ready to be copied to a card via dd.

On my desktop machine, I can build a basic image for the Pi from scratch, including the kernel, and write it to an SD card all in under 10 minutes.  Subsequent builds are even faster since LTIB caches previous build output and rebuilds only what it needs to.

Sounds great, sign me up!

Excellent!

Go to LTIB.org and follow the download instructions.  Bitshrine.org isn’t able to host the official RPi toolchains, so an RPM containing all three of them is available at https://github.com/downloads/midnightyell/RPi-LTIB/raspberrypi-tools-9c3d7b6-1.i386.rpm.  You may either install this yourself via rpm -i, or place the rpm file in /opt/ltib/pkgs, and LTIB will install it for you on the first run.

How exactly do I run this thing?

For now, I refer you to the LTIB documentation.   Once it’s installed, start with ./ltib -c

I’ll write up more step-by-step instructions in a later post.  I’ll also write a walkthrough on how to add your own packages, and tips on getting LTIB to successfully cross-compile them.

Please keep in mind that LTIB for Pi isn’t perfect.  Many of the supported packages are out-of-date.  Some may not build.  Not all of the packages have correct dependency information.

But if you need a low-memory usage Linux for your Pi, this is a hell of a start.

Why did you do this?

Mostly as a learning experience.  I wanted to make my own cross-compiling toolchain and rootfs.  I wanted to have Linux running in as little RAM as possible so that more would be available to my applications.  And I had already been working on related things at work, so I was fairly far along the learning curve when I started.

Links